Wednesday, September 8, 2021

Bella Blouse

I've wanted to sew this blouse pattern for a long time. It has been almost 2 years since I first saw it as a test pattern. I didn't test it as I was in the midst of another test pattern. 

When I was making the Spousal Unit a shirt in June, I fussy cut out the pattern. It sat around waiting to be made. I finally had time at the end of August. 

I am so happy I took the time to fussy cut this blouse as I could line up not only the side seams but the darts and tucks. I had a great time making sure it was done perfectly. 

The pattern went together really well and fit the doll well.

I didn't rush the process as I wanted to make sure the lines matched perfectly. 

I am pleased with the results and will make this blouse again. I do love patterns that are well drafted. Fussy cutting makes them look high end. 

Something I learned when sewing on the snaps. I used 2 snaps by Dritz and 1 by Prym. While sewing on the Dritz snaps, the waxed thread broke very easily due to sharp edges in the holes. That didn't happen with the Prym snaps. I'll be using Prym snaps only once the Dritz snaps are used up.  

Happy Doll Sewing.....................................................

Saturday, August 14, 2021

Fussy Cutting Project Completed

 The jacket is done and was worth all the time spent fussy cutting it out. 


There is a wow factor to this jacket with the placement of the rose on the back. 


I am not sure if I should have put the big flowers on the sleeves but they do not detract from the overall look. In actual fact, the chosen fabrics play well together (they were part of collection). The only piece that doesn't play well is the tote. Though the stripe is part of the collection, the colors do not match up with the print.

It matches as I chose thread colors that go with the jacket. It helps detract from the stripe. 

I hope to make this jacket again. Rather than fabric for the  ruffles and peplum, I want to use gathered lace trim. I have some chambray fabric left from the wardrobe I'm making and may do the cross hatch embroidery on the sleeves. I am still in the planning stage and need to spend some time thinking how it will work. 

The test group has decided to rotate people out of the group to allow new testers to bring their take on patterns to the plate. I asked to be rotated out in the first group and was denied. I hope they rotate me out soon or I will be asking to leave once again. 

Happy Doll Sewing.......................................................

Friday, August 6, 2021

Thinking About Testing and Fussy Cutting

 I am not missing but have been thinking a lot lately about sewing. I looked at my focus for the year, "sewing what I have". That had me looking at pattern testing. It is the one area that sends me buying fabric as I say I don't have the right fabric. That ends up getting costly and the stash does not decrease. All we get out of pattern testing is the pattern.

I am coming to the end of testing for designers. July was a month of having to test a pattern I didn't want to do. Feed back was horrid and I almost cried for all of the people who took the time to test. This is the point that I realized I was coming to the end of testing. The second pattern was one I wanted to test and it helped calm me down but it didn't change my mind.

A pattern came out that looked interesting and I do like the designer. I thought on it for a couple days, hunting through the stash. I decided I would make it out of fat quarter remnants that just wasn't singing to me until this pattern. It was a 2.5 hour fussy cut job.

I enjoy fussy cutting but have never done a whole pattern. It was an experience that was rewarding. I did use coordinating fabric and decided the look was going to be shabby chic. My process was probably not traditional as I started off with fussy cutting the sleeves which were the largest pieces. 

Once I got them done, I focused on the body pieces making sure I had some flower showing on each piece. The back has a large rose on it. The sides had roses on them also using a different fabric.

On the fronts, I made sure I had rose buds showing along with roses on the side pieces. 

The peplum pieces are not cut but are ready to be done. The upper peplum will be in the green and the under piece in the side fabric. I'm running short of fabric. 

It has been well worth the time fussy cutting this pattern. I have the body done ready for the sleeves. 

So far the fabric is playing nicely together and no one piece is over powering the rest. Hopefully it remains like that when the sleeves are set in. 

I will fussy cut again as this test has given me the confidence to it and to do it on almost all pieces of the pattern. It has given me a new outlook on large prints for doll clothes. 

On a note, this is the only pattern I will test this month. It is one of my decisions. 

Do you fussy cut to get a specific look?

Happy Doll Sewing....................................................

Friday, July 9, 2021

Making A Doll's Wardrobe

 I decided to make another doll's wardrobe as I enjoyed making Kit's a couple of years ago. This wardrobe is more modern and will include more patterns than Kit's did.

I have set a deadline for Christmas as I'm only able to work on this when I have time or need to have something fun to make. I also am looking for patterns to include in the wardrobe. Some are test patterns, some are in the pattern collection and some are free from Pixie Faire. 

I started the collection with a test outfit in a chambray blue print. I'm quite happy with it as a starting point for the wardrobe. 

To this I added a top in the print making a 2 piece dress. 

I am knitting a sweater and tam in a denim ombre yarn to go with the wardrobe.

The idea is to add the following items of which the fabric is in the stash:

  • Leggings - denim blue
  • Capri leggings - white
  • T-shirt - white (not sure if sleeveless or short sleeved)
  • Button up dress - denim print

 I have wanted to make a button up dress that does not have a 1950's vibe and finally found the hack for it.  So, it is on the list. 

I have to dig for the fabric, but I also want to make:

  • Top
  • Skirt
  • Shorts

I need a bit of color in this wardrobe. I'm looking in the stash to find colors that will go with the chambray.

I will keep you posted on my progress. 

Happy Doll Sewing...........................................

Thursday, June 3, 2021

Sleeveless T-shirt Hints


 I got back to the doll's sleeveless t-shirts after quilting 4 placemats. I had a great time making them. 

The pattern is great fitting and is quick to make once you have added the following to the pattern.

  • 1/4" to back seam

  • 1/8" to neck edge

  • 1/8" to arm edge

I had this much fabric left for both of the sleeveless t-shirts so the scraps hit the trash bin. 

Once cut out, I fused interfacing to the back edge, sewed the shoulder seams and neck edge like before. I serged the back edged as before. 

As before I was careful to lay the t-shirt out carefully so it wouldn't stretch. When stitched, I trimmed the excess fabric from the neckline. 

The arms were done exactly the same as the neckline. I carefully laid the armhole onto the sewing machine bed so it wouldn't stretch and stitched the turned over edge carefully. I trimmed off the excess material also. 

At this stage, I gave it a good press and finished the t-shirt like before -- side seams, hem, and finish the back seam. 

Unfortunately I didn't make capri length leggings to go with this top so it's full length leggings. 

My last project to make is a wrap dress shown on the Pixie Faire blog. I'm ready to get out another pair of children's leggings to make this one. I will put knits to bed once it is done as I've really made progress sewing with knits.

Happy Doll Sewing...................................................

Wednesday, May 26, 2021

A Bodice Hack For The Gotz Dolls

 I haven't got lost or gone missing. I've been busy. I spent a lot of time designing a bodice for the Gotz dolls. I used the bodice from one pattern and then used another pattern to make it better. 

Take One

To get a good idea of what I needed to do, I made the bodice from Pink Ladybug Fashions for a doll that is only 1/2" taller than the Gotz dolls.

This pattern is well drafted and the first muslin fit quite well. 

The tummies on these dolls create a bit of a fitting issue. I got out an unpublished pattern designed by a friend and laid started to look at what I needed to do. 

Using the drafting lessons from Pattern Designing, I worked until I got a bodice pattern I was happy with. 

Take Two

I lengthened the bodice and was happy with the fit. 

I attached the skirt to make sure it fit. Not too bad.

Take Three

Next was to add the sleeves to the bodice and do the final fitting. 

Take Four

In the end, I did take 1/4" off the center back, 1/16" off the front and back waist and worked on the side seams a bit. 

It was time to make the dress using a lovely piece of cotton from the stash.

I'm thrilled with the bodice. The sleeves are from the original pattern. I want to make them elbow length to see how they look. That means another bodice from scrap fabric. 

I'm doing some quilting right now and will be back to work on the sleeveless t-shirts and maybe a quilt for the dolls. 

Happy Doll Sewing..........................................

Monday, May 10, 2021

Sewing A T-Shirt Part 4

 When we stopped the other day, we had the t-shirt looking like this.

I had looked at the sleeves when I returned to the sewing room thinking they had stretched while hemming so I checked using the pattern. 

All was good. If not, I would have centered the pattern on the sleeve and cut off the excess on each side. 

Setting In The Sleeves

I folded the sleeves in half to find the center of the sleeve cap and put in a pin. 

I then pin the center to the shoulder seams and the ends to the body. 

I then pin the sleeve in and carefully sew it in place. I pressed the sleeve towards the body of the t-shirt.

 
I didn't trim the sleeve seam allowance but you could if you wanted to. 

Side Seams

The side seams are easy. Pin them together and sew 1/4" seams. Press open. 

The Hem

The hem is done next.  I machine baste  3/8" and then serge it. You don't have to serge it as you can trim the excess fabric back to the stitching like the sleeves and neckline. 

I turn the hem under, pin it in place and stitch carefully so I don't stretch it out of shape. Give it a good press. 

The Back Opening

The back opening is the last step. Fold the back opening so the finished edge is even with the inside edge of the interfacing.

Give a good press and stitch down close to the cut edge. 
Your t-shirt is done and ready for fasteners. 
The choice of fasteners is yours. You can use snaps, poppers or velcro. I use snap fasteners and sew 4 onto the top. 
The front of the t-shirt.

The back of the t-shirt.

In Conclusion

I love this pattern when I got it 3 years ago. But, I have struggled with the neckline and back opening and, out of many many tries, I got only 2 t-shirts worth keeping. The rest hit the trash bin. 

I realized that I needed to make some changes to the pattern so I could sew it successfully. The first was the center back seam. Not only did the interfacing stabilize the back seam, I had more space to sew on snaps. The second change was the neckline. I added to it and, on my old machine, sewed it using paper underneath it. It wasn't until I got my new machine that I was ready to tackle t-shirts once again. 

I have  enough fabric left to make 2 pairs of leggings and, hopefully 2 sleeveless t-shirts. I'll be printing the pattern again to add to the arm opening. I'll report back on how that works when I get it done.

Happy Doll Sewing.......................................

Sunday, May 9, 2021

Sewing A T-Shirt - Part 3

 I took a few minutes to read the pattern instructions and they are well written. I wish I could sew the necklines like Cinnamon does but I can't. Hence why I am doing this tutorial of how I do it.

Cutting Out the Pattern

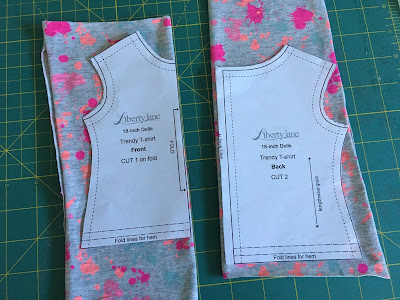
When using leggings, you need to cut off the hems and waistband. Then you cut off the seam allowances to get your fabric. For a t-shirt, I use the torso part of the leggings leaving the legs for leggings. 

I try to lay the fabric on the grain as best I can. I use the outside seam (fold) to help me. One side of the torso is for the front and sleeves.

The other side is for the back. 

I talk to myself when cutting out so I remember to cut on the pencil lines at the neck and center back seam. 

I also cut  2 - 1" wide strips of fusible knit interfacing for the center back seam.


Pressing the Pieces

I press the small pieces to get the wrinkles out and then press the interfacing to the back seam. I cut off the remaining bits of interfacing at the top and bottom.

At the Machine

I can choose between two feet for 1/4" seam allowances.

I chose the one on the left as it does not have the little edge which hinders me on curves. I also have use the main foot for my machine when necessary.

I put in a new needle (Microtex 12/80) and I'm ready to sew.

Sewing the Shoulder Seams

One of the little things I learned years ago was to sew the shoulder seams from the shoulder to the neck on both sides. Your machine is pulling the fabric the same way for both shoulder seams. I also don't finish a lot of the seams when sewing knits as I don't sell my doll clothes and knits don't fray. I do serge the back seams to hold the interfacing in place though. 

If you finish the seams using a serger, serge before you sew. You can also use pinking sheers for a nice finish. If you choose this method, cut out the pattern using them. 

The Neckline

I changed the foot to the main one when sewing a basting line around the neck. I like the wider foot to help hold the fabric but it isn't necessary. The distance is 3/8" from the cut edge.

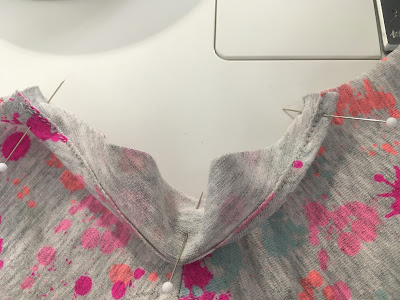
I fold the neckline down on the line at the shoulder seams and then fold from that point to the back seam. Pin in place. Next I pin the center front and work towards each shoulder seam. The pins are on the right side as that is the side you will top stitch on.

I use a stitch length of 3.0 and slowly stitch around the neckline a good 1/8" from the edge. I remove the pins carefully. I adjust the neckline to keep its shape while I sew so it won't stretch out of shape.

When I checked the underside, I saw an oops. I carefully picked out that spot and redid it carefully.

I trimmed back the excess fabric close to the stitching line. I use duckbill scissors but you can use regular scissors as I did until I found the duckbill ones in a drawer of quilting stuff.
 

It's over to press the neckline so it lays flat. I just lay the iron on the neckline and give it a shot of steam. This picture is taken with the t-shirt on a sleeve board.

The Sleeves

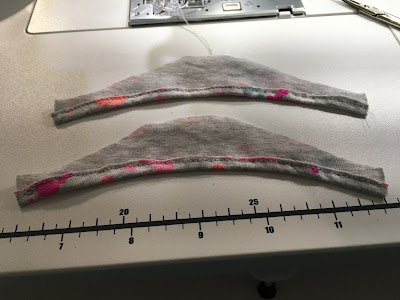
The process for the sleeves is the same as the neckline. Baste a line 3/8" from the bottom edge, turn under and stitch closer to 1/8". Trim off the excess fabric and give a good press.

I didn't do any more as my phone was almost dead and needed recharging. It was enough for one day also. 

More tomorrow. 

Happy Doll Sewing......................................

Thursday, May 6, 2021

Sewing A T-Shirt Part 2

 I squeezed in adjusting the pattern yesterday afternoon. The job isn't a big one, it takes a few minutes to do after you print the pattern. 

For this job, you need a pencil and a ruler. I have a ruler that shows 1/16" marks and have had it for years. I use cheap mechanical pencils. I've used them for years. A vinyl eraser is a must if you need to erase. All these items I buy in late summer when they go on sale for school. 

Step 1 - The Front

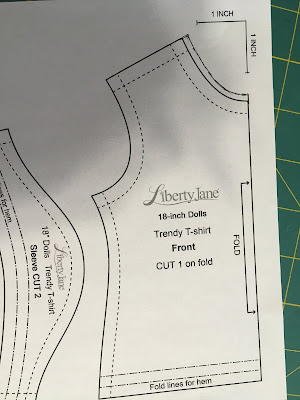
Draw a line 1/8" extending the center front line and the shoulder cutting line. Using your ruler draw small dashes 1/8" from the neck line. I have the ruler at an angle for the most accurate marking. 

Join the lines together as smoothly as possible. I find the closer the little dashes are the easier it is to connect them smoothly. 

Step 2 - The Back

Draw a line 1/4" from the center back cutting line. Extend the lines from the shoulder and hem cutting lines. 

Draw the dots from the neckline 1/8" away as you did on the front piece. 

Draw the dots together at the neckline.

Step 3 - the Sleeve

I didn't do anything to this sleeve though I drew a line to extend it. Ignore those extended lines. If you want a straight sleeve, you can draw a straight line across the sleeve with no extension. I did that with the previous pattern. This time I'm going with the curved sleeve.

You are now ready to rough cut your pattern out. I do that just before I lay the pattern out on the fabric. 

Next time, we will cut out the pattern and begin to sew it. You will need knit fabric, and some light weight interfacing. I use a fusible knit interfacing. My fabric will be a pair of children's leggings. Set up your sewing machine and serger if you have one. 

Happy Doll Sewing................................